Sunday, 13 October 2013

Convert visual studio 2012 project to visual studio 2010

To convert visual studio 2012 project to visual studio 2010 you have to do only two changes in two files.Fist change you have to do in your .solution file , for this you have to open your project solution file into text editor and do following changes :


  • Change "Microsoft Visual Studio Solution File, Format Version 12.00" to "Microsoft Visual Studio Solution File, Format Version 11.00"
  • and "# Visual Studio 2012" to " # Visual Studio 2010"

and now right click your project file and open it in text editor and change :
  • <TargetFrameworkVersion>v4.5</TargetFrameworkVersion> to "<TargetFrameworkVersion>v4.0</TargetFrameworkVersion>"
And you are done , now open your project in visual studio 2010 and start codding :)

Saturday, 5 October 2013

What is "Code Re-factoring" ?

Recently I go through the process of code re-factoring, before going into detail lets have definition of re-factoring, i.e. "It is process of code restructuring without changing its behavior", first question that may arises is that why we need to restructure our code and this will not going to effect the behavior of our system and the answer will be the detail of re-factoring, now lets assume one developer work one module of the system and other work on another and both developers merge their code, so during these steps developers wrote their code consists of classes containing methods and in methods there may be instantiation of objects, so as the other developers do.
1- After merging first scenario (very common one ) can occur i.e. same general chucks of code for doing       identical work but consists of different method names.
2-Un-necessary creation of methods ( call only from one place)
3-Un-necessary creation of variables ( usually we do for debugging purposes)
4-Extra long methods ( un-necessary logic)

You can find different possible combinations from above points after reviewing your code and when you will remove things like these then this process will be called "Code Re-factoring".


Saturday, 28 September 2013

Extjs, prevent images from being cached

 In order to prevent images from being cached just do one thing, append cache buster i.e cb=new Date() (or any other dynamic value could be replaced with new Date() object) to the the image source as query string , just as given below :

myImage.setSrc('../images/myImage/name.png'+'?cb='+new Date());

Thursday, 26 September 2013

Extjs, apply class on runtime on actioncolumn of grid

we can apply class on rederer funtion of actioncolumn by checking records property easily as shown below :

 {
                    xtype: 'actioncolumn',
                    width: 70,
                    dataIndex: 'DataIndex',
                    menuDisabled: 'true',
                    text: 'text',
                    sortable: false,
                    fixed: 'true',
                    renderer: function (value, metadata, record) {
                        if (record.get('IsEnabled')) {
                            metadata.tdCls = 'cssClass'
                        }
                    }
                }

Extjs, create view object , with some properties at runtime

Lets say I create instance of a view and I want to apply some property on it , then this is the way I can give properties to it on runtime.

var addView = Ext.create('App.view.Add', { flex: 1 });

Disable chrome security

By excuting this command "chrome.exe --disable-web-security" in run of your windows , you can disable your browser's security , mostly used for running sencha touch apps using api calls.

Extjs, Ext.string.format used to implement mailto functionality on anchor click inside grid column using renderer funtion

columns: [
    {
        header: 'Email',
        dataIndex: 'email',
        renderer: function(value) {
            return Ext.String.format('<a href="mailto:{0}">{1}</a>', value, value);
        }
    }

Extjs, UI manipulation using parent element id and get its childs from class applied

That's what use this logic on store load , one the stored load success then manipulate you UI( use this on render function of under use controll):

 onGridRendered: function (grid) {
       store.load({
           scope: this,
           callback: function (records, operation, success) {
               if (success) {
                   var parent = Ext.get('ID of element');
                   var elems = parent.select("div.class of elements").elements;
                   for (var i = 0; i < elems.length; i++) {
                       elems[i].hidden = true;
                   }
               }

           }
       });
}

Scencha touch , check the OS i.e. is Desktop,Tablet etc

Following is the code snippet which tells you about current system ( actually sencha touch ):
if(Ext.os.is.Tablet){
    console.log('tablet');
}else if(Ext.os.is.Phone){
    console.log('phone');
}else{
    console.log('other');
}

Extjs, how to implement delay

In order to use delay funtionality in extjs , you must create Ext.util.DelayedTask object and use its delay method which takes span of time to be delayed in miliseconds, i.e.

Following is an exmple of using delay functionality in extjs:

var task = new Ext.util.DelayedTask(function(){
    alert(Ext.getDom('myInputField').value.length);
});

Ext.get('myInputField').on('keypress', function(){
    task.delay(500);
});

OOP concep of Shadowing , definition with example

Shadowing is very important concept of object orient programming (OOP), used with polymorphism because it involves runtime binding of objects ( pure polymorphism), it states that : " shadowing is actually stands for hiding overridden method implementation in drived class and used the implementation of parent class with drived class object", does it make sense ??, indeed but if not follwing example will make it clear for you.
This is full testable code of shadowing implementation :


class Program
    {
        static void Main(string[] args)
        {

            Person[] listPerson = new Person[2];
            listPerson[0] = new GoodPerson();
            listPerson[1] = new BadPerson();
            foreach (Person obj in listPerson)
            {
                Console.WriteLine(obj.getCategory());
            }
            Console.WriteLine(new BadPerson().getCategory());
            Console.ReadKey();
        }

        public class Person
        {
            public virtual string getCategory(){

                return "Hi I am a person";

            }
        }

        public class GoodPerson:Person
        {
            public override string getCategory()
            {

                return "Hi I am a Good Person";

            }
        }
        public class BadPerson:Person
        {
            public new string getCategory()
            {

                return "Hi I am a Bad Person";

            }
        }

    }


The output of the program will be :

Hi I am a Good Person
Hi I am a person

The trip behind this is to use "new" keyword instead of "override" with your virtual methods and that's all.

Monday, 23 September 2013

Apprise V2 is rising , new features for your popups using jquery


AppriseV2 is On now , with new look and feel with amazing effects , check that out on library page :

http://labs.bigroomstudios.com/libraries/Apprise-v2

Extjs, use function in tpl , in gridPanel's templateColumn

 {
           header: '',
           xtype: 'templatecolumn',
           tpl: ['<div>' +
                    '<div>' +
                        '<tpl for="data">' +
                            '<tpl if="Title.length &gt; 0">'+
                                '<div>{Title}</div>' +
                            '</tpl>' +
                            '<div>{[this.shorten(values.fullName)]}</div>' +
                        '</tpl>' +
                    '</div>'
                   , {
                    shorten: function (noOfTimes) {

                        return noOfTimes;
                    }
                }], 
       },

That's how we can use functions in tpl.


Sunday, 22 September 2013

Custom controls introduction, Creation and usage in asp.net project

A best friend of mine recently requested me to create a post for "Custom Controls creation and use in asp.net " with example and detailed explanation , so today I am going to talk a bit about custom controls which leads to a practical example of how to create a custom control and how to use it in your asp.net project.
First lets have little introduction of custom controls :
"Custom controls are individual assemblies, compiled into a dynamic link library (DLL) and used as any other ASP.Net server control", we can create them by :
  1.  deriving from the base control class ( today's example )
  2. driving from one existing control ( extending functionality of existing one )
  3.  combing two or more existing controls ( combination of more than one existing controls )
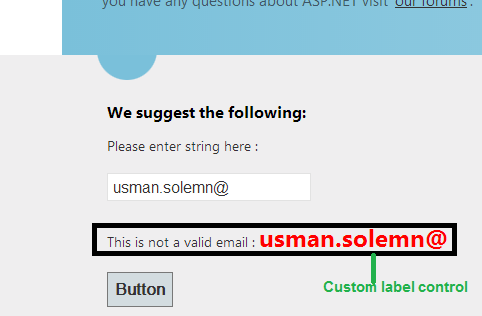
Today we have example of first type , we are going to create a custom label , the functionality of this label is that , when we set its text , it will validate if the assigned text is a valid email or not and change its color and append message as prefix like this in screen shot :


Now lets see how to create an asp.net custom control first :
  • Open visual studio , go to File->New->Project
  • Select Web projects and select Asp.net Server Control project
  • Name it , lets say CustomLabelControl
  • When you create project , you will have ServerControl1.cs class inherited from WebControl class, this is every thing for your custom control.
  • There will be a method " protected override void RenderContents( HtmlTextWriter output)", which is key , that is how your control will response to you visually , just copy and replace the following code with it :         

     protected override void RenderContents( HtmlTextWriter output)
            {
                  if (!String.IsNullOrEmpty(this.Text))
                    {
                            if (this.IsValidEmailAddress())
                              {
                                    output.Write("This is a valid email : ");
                                      output.Write("<FONT size=5 color=Blue>");
                                        output.Write("<B>");
                                          output.Write(Text);
                                            output.Write("</B>");
                                              output.Write("</FONT>");
                                            }
                                              else
                                                {
                                                      output.Write("This is not a valid email : ");
                                                        output.Write("<FONT size=5 color=red>");
                                                          output.Write("<B>");
                                                            output.Write(Text);
                                                              output.Write("</B>");
                                                                output.Write("</FONT>");
                                                              }
                                                            }
                                                              else
                                                                {

                                                                        output.Write("<FONT size=5 color=red>");
                                                                          output.Write("<B>");
                                                                            output.Write("Must enter something to validate!");
                                                                              output.Write("</B>");
                                                                                output.Write("</FONT>");
                                                                              }
                                                                            }

                                                                    It is using IsValidEmailAddress() method which can be defined in the same class as :


                                                                       protected bool IsValidEmailAddress( )
                                                                            {
                                                                                try
                                                                                {
                                                                                    // this is use for time saving, not optimal solution , but you can replace it with regular expression
                                                                                    MailAddress m = new MailAddress(this.Text);
                                                                                    return true;
                                                                                }
                                                                                catch (FormatException)
                                                                                {
                                                                                    return false;
                                                                                }
                                                                            }

                                                                    • And that's all , your custom control is ready to use , now build your project.
                                                                    Now second part starts from here , i.e how to use this control in your asp.net project, simple three step process :
                                                                    • Add reference of this control ( project dll ) to your asp.net project where you want to use it.
                                                                    • Register the control on the page where you want to use it , just directly below the @page directive like that :

                                                                    <%@ Page Title="Home Page" Language="C#" MasterPageFile="~/Site.Master" AutoEventWireup="true" CodeBehind="Default.aspx.cs" Inherits="CustomControlTest._Default" %>
                                                                    <%@ Register Assembly="CustomLabelControl"  Namespace="CustomLabelControl" TagPrefix="ccs" %>

                                                                    • Add control to your page like this :                                                                               <ccs:ServerControl1 runat="server" ID="ServerControl11" Text = "" />
                                                                    • Now just set the text of this control , behind any event , lets say on button click,                     protected void Button1_Click(object sender, EventArgs e)

                                                                              {
                                                                                    this.ServerControl11.Text = this.TextBox1.Text;
                                                                                  }

                                                                          And this control will be automatically say if this is a proper email address or not.
                                                                          Sample solution project with custom control project and its use in asp.net project is attached here :    CustomControl Project.

                                                                          Thursday, 19 September 2013

                                                                          Custom validation message , Extjs

                                                                          With invalid text property we can display custom message :
                                                                                  xtype: 'datefield',
                                                                                  allowBlank: false,
                                                                                  fieldLabel: 'Start date',
                                                                                  msgTarget: 'under',
                                                                                  invalidText: 'This value is not a valid date!'
                                                                               Ext.data.validations.presenceMessage = "error here";

                                                                          Attach view to button , Extjs

                                                                          To attach a view ( must be a floating component like window ) to a button , so that on clicking a button results a view to open attached to that button , you can use the following code inside your button click action inside your controller. i.e.

                                                                          var menu= Ext.create('Main.view.MyView', {
                                                                                      left: 0,
                                                                                      padding: 10,
                                                                                  }).showBy(button);


                                                                          Apply tool tip to grid cells , Extjs

                                                                          To apply tool tip to grid cells first create renderer and set metadata.tdAttr to 'data-qtip='"your value "; i.e. as given below :


                                                                           renderer: function (value,metadata, record, rowIndex) 

                                                                          {
                                                                                        
                                                                          metadata.tdAttr = 'data-qtip="' + value + '"';

                                                                                       return value;
                                                                          }


                                                                          and that's it :)

                                                                          Saturday, 14 September 2013

                                                                          jQuery , printer access ( print area inside a #div )

                                                                          In order to open the printing dialog into the same page you must follow the following steps:


                                                                          • Must include jquery script inside header
                                                                          • Create Iframe inside your html body , like this :                                                                                 <iframe id="iframe" width="0" height="0"></iframe>
                                                                          • User following lines on click event of any element ( lets say button ): $('iframe').contents().find('body').html($(this).html());                                         window.frames['iframe'].print();


                                                                          And that's just all.